Friday, September 29, 2017

Rustic Musical Season

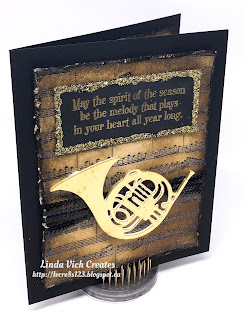
Linda Vich Creates: Rustic Musical Season. Sheet music, distressing and a gold instrument combine to create this vintage Christmas card.
I couldn't wait to play with the new Sheet Music background stamp because I love the use of music notes with Christmas projects! One year, I got two sheets of music duplicated (for personal use only) and distressed it to use as place mats for my Christmas dinner.

With today's card, I started by using my MISTI to stamp the notes with Versamark and then Basic Black, on Whisper White, so that I could emboss them with Clear Stampin' Emboss Powder. I then used sponges with Crumb Cake, Soft Suede and Early Espresso to distress the embossed matte. I also used the now retired Distress Tool to roughen the edges.

On a scrap of Basic Black, I stamped the sentiment from the Musical Season stamp set with Versamark and heat embossed it with Gold Stampin' Emboss Powder. I distressed the edge and then used the retired 2-Way Glue Pen and some Gold Stampin' Glitter on the edges.

While my sentiment was drying, I die cut the horn from Gold Foil as well as three other horns from Whisper White. I adhered them all together with liquid adhesive and then inked the edge of the horn with a Gold Sharpie. Unfortunately, I couldn't do the inside parts because the pen nib was too thick for the openings.

After wrapping a length of the Mini Black Sequin Trim around the matte and securing with tape, I adhered the matte to a 4.75 x 6" Basic Black card base. I adhered the horn and the sentiment with Dimensionals.

For the inside matte, I followed the distress routine already used but kept the middle lighter. I stamped and heat embossed the sentiment and adhered the matte to complete the card.

Linda Vich Creates: Rustic Musical Season. Sheet music, distressing and a gold instrument combine to create this vintage Christmas card.


Thursday, September 28, 2017

Thankful Painted Harvest

Linda Vich Creates: Thankful Painted Harvest. Bermuda Bay and Cajun Craze combine in this fall card using the Painted Harvest set.
Today's card was inspired by the color scheme in this card.

I chose a 5 x 7" format and cut a card base from Early Espresso and mattes from Cajun Craze, Bermuda Bay, and Thick Very Vanilla. I also cut smaller mattes after first die cutting the Thick Very Vanilla matte with the #4 stitched square from the Stitched Shapes Framelits.

On the die cut Vanilla piece I also stamped the sunflower from the Painted Harvest stamp set using Bermuda Bay, Cajun Craze and for the centre, Soft Suede. The three small mattes were then stacked and adhered using liquid adhesive. A length of the Copper Trim was tied in a bow around the stack.

Using the smaller layered stack as a guide, I then stamped four more flowers, peeking out from where the stack would be adhered on the large Very Vanilla matte. I then stamped the detailed leaves with Cajun Craze, stamping them second and third ties as I moved away from the stamped sunflowers. Additional leaves were stamped on Very Vanilla and punched using the coordinating punch.

The three large mattes were then stacked and adhered together and two pieces of Burlap Ribbon and a length of the Bermuda Bay 3/8" Stitched Ribbon were wrapped around the stack. The stack of mattes was then adhered to the card front using Dimensionals. The smaller stack of mattes was adhered on the top right of the card front, over the stamped sunflowers.

The sentiment was stamped with Cajun Craze on Bermuda Bay and then punched with the Pretty Label Punch. A second label was punched from Cajun Craze and trimmed to use as a matte for the sentiment. The sentiment was adhered to the card front using Dimensionals.

To complete the card front, the punched leaves were adhered both under the sentiment and the smaller stack of mattes. Three of the White Perfect Accents were colored with a Sharpie and adhered to the ribbon.

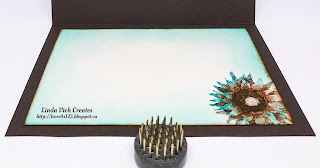
On another Thick Very Vanilla matte, a sunflower was stamped and then the edges were inked with both Bermuda Bay and Cajun Craze.


Linda Vich Creates: Thankful Painted Harvest. Bermuda Bay and Cajun Craze combine in this fall card using the Painted Harvest set.

Linda Vich Creates: Thankful Painted Harvest. Bermuda Bay and Cajun Craze combine in this fall card using the Painted Harvest set.


Tuesday, September 26, 2017

Painted Harvest Birthday Using Eclipse Technique

Linda Vich Creates: Painted Harvest Birthday Using Eclipse Technique. A bright and cheerful card using the Eclipse Technique and featuring the Painted Harvest stamp set.
How much fun are the cards using the Eclipse Technique (sometimes called the Floating Letters Technique)? There are so many variations to be seen and they can be designed to meet the needs of any occasion–birthday, season, Christmas, etc.

All you need for the Eclipse Technique is to choose a word, a card front that fits the word, and a stamp set or sets to use! A search on YouTube will turn up a number of tutorials for the technique but one that I like is by Gaynor Boyce.

Of course, you will also need to use the Large Letters Framelits. Though these are a very expensive set, you can get them for 50% off when you have a qualifying order. I have used my Framelits many times after purchasing them and the Eclipse Technique provides many opportunities to use them.

My first Eclipse card was designed for a birthday and I chose to use the lovely Painted Harvest stamp set. Because Simone's name was quite long, I designed my card to be 4 x 8.5" in size. After cutting my card base from Berry Burst, I cut two Basic Black and two Thick Whisper White mattes. I used liquid adhesive to adhere one Whisper White matte to a Basic Black matte and then adhered the second Basic Black matte to the card front.

To begin with, I laid out the letter's of Simone's name on a white matte to see where they would fall. This allowed me to plan out my stamping.

I started by stamping the sentiment, from the Tabs For Everything stamp set, with Basic Black. I then used Daffodil Delight, Tangerine Tango and Berry Burst to stamp the sunflowers. I also stamped one complete flower on a full-adhesive Post It Note and then fussy cut it. I used this as a mask on the flowers so that when stamping the leaves in Wild Wasabi, it would look like the leaves were behind the flowers.

With my stamping complete, I laid out the six letters and then drew a light pencil line to be sure that my alignment of the letters would be perfect. I used the Big Shot and my Magnetic Platform to die cut the letters. I also die cut a second set of the letters from another piece of Thick Whisper White.

Using liquid adhesive, I glued all the stamped letters to the second set of letters. In the case of the O, the two pieces of the stamped letter O was replaced into the die cut opening. The middle of the O was then adhered with liquid adhesive and then the outer part of the O was removed again. I then adhered the stamped matte to the Basic Black matte on the card front.

I applied Foam Adhesive Strips to all the letters and then placed each into its die cut opening on the card front.

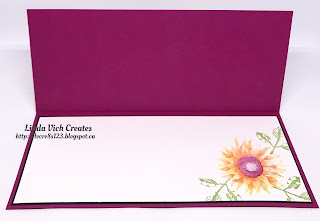
For the inside of the card, I simply stamped a single flower and some leaves in the bottom right corner of the remaining Whisper White matte and then adhered the matte inside the card.

Linda Vich Creates: Painted Harvest Birthday Using Eclipse Technique. A bright and cheerful card using the Eclipse Technique and featuring the Painted Harvest stamp set.

Linda Vich Creates: Painted Harvest Birthday Using Eclipse Technique. A bright and cheerful card using the Eclipse Technique and featuring the Painted Harvest stamp set.

Linda Vich Creates: Painted Harvest Birthday Using Eclipse Technique. A bright and cheerful card using the Eclipse Technique and featuring the Painted Harvest stamp set.

I am so pleased with how this card turned out! The colors are bright and cheerful and the stamping looks so cool on the raised letters!

I hope that you have enjoyed my card and that you will try this technique for yourself!


Saturday, September 23, 2017

Painted Harvest Fancy Fold Flap Card

Linda Vich Creates: Painted Harvest Fancy Fold Flap Card. A delightful medley of Tranquil Tide, Lemon Lime Twist and Pool Party bring to life a Painted Harvest sunflower on this fancy flap card.
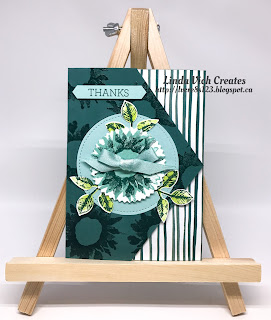
Today I used a Fancy Flap Card Fold for my card share which I CASEd from Debbie Henderson. This was a fun card fold to create and I got to use my new favorite stamp set–Painted Harvest! If you haven't yet purchased this set with the coordinating leaf punch (which you can get as a bundle at 10% off), you really should consider it! The color combos for the flower are endless and being able to punch out the leaves to go with it is really sweet!

To create this card, I cut a card base of 5.5 x 11" from Tranquil Tide. I scored on the long side at 4 and 8" to create a total of three panels–4 x 5.5" (front), 4 x 5.5" (middle) and 3 x 5.5" (end panel that folds inward).

Working with the front panel, I measured and marked 2.75" on the 5.5" side and 2" on the 4" side. I then used my Stampin' Trimmer to line up the marks to end up with a diagonal cut on each side of the front panel.

Next, I used the #8 circle in the Layering Circles Framelits to cut a hole in the middle of the front panel. I also used #4 circle in the Stitched Shapes Framelits to cut a circle from Pool Party. Please check my Numbered Die Sets on my blog to see how I number my dies.

I used the smallest flower with Versamark to stamp over the front panel of the card, masking the back with Post-It notes. I then heat embossed the flowers with Clear Stampin' Emboss Powder.

For the end panel of the card, I cut two pieces of striped paper from the Whole Lot of Lovely DSP, 3 x 5.5" and used liquid adhesive to glue these to both sides of the panel.

I used my MISTI to stamp the sunflower on Whisper White card stock. I could have stamped the sunflower easily without the MISTI after learning how to line up and mark my stamps to get good alignment each time. However, I wanted to stamp each stamp two times so I used my MISTI to make it even simpler. I used Pool Party for the largest flower, Tranquil Tide for the smaller flower, and Pool Party (stamped just once) for the inside of the flower. I then used the Starburst Punch.

For the leaves, I stamped the leaves with Lemon Lime Twist 2X and the detailed stamp with Tranquil Tide just once and then punched them with the coordinating leaf punch.

The sunflower was adhered to the stitched Pool Party circle using Dimensionals. With the card closed, the stitched circle was adhered to the panel below it using Dimensionals. The leaves were adhered under the flower using liquid adhesive.

The sentiment from the Crazy About You stamp set was stamped with Tranquil Tide on Pool Party and then punched with the Classic Label Punch. It was adhered to the card front using Mini Dimensionals.

Inside the card, the detailed leaves were stamped with Tranquil Tide and the sentiment was stamped with Basic Black.

Finally, a bow made from the Pool Party Shimmer Ribbon was adhered to the centre of the sunflower using Glue Dots.

Linda Vich Creates: Painted Harvest Fancy Fold Flap Card. A delightful medley of Tranquil Tide, Lemon Lime Twist and Pool Party bring to life a Painted Harvest sunflower on this fancy flap card.

Linda Vich Creates: Painted Harvest Fancy Fold Flap Card. A delightful medley of Tranquil Tide, Lemon Lime Twist and Pool Party bring to life a Painted Harvest sunflower on this fancy flap card.

Linda Vich Creates: Painted Harvest Fancy Fold Flap Card. A delightful medley of Tranquil Tide, Lemon Lime Twist and Pool Party bring to life a Painted Harvest sunflower on this fancy flap card.

Linda Vich Creates: Painted Harvest Fancy Fold Flap Card. A delightful medley of Tranquil Tide, Lemon Lime Twist and Pool Party bring to life a Painted Harvest sunflower on this fancy flap card.
I hope you have enjoyed reading about this Fancy Flap Fold Card!


Friday, September 22, 2017

Detailed Gate 50th Anniversary

Linda Vich Creates: Detailed Gate 50th Anniversary. The Detailed Gate Thinlits are used to create golden gates for this 50th Anniversary card.
I got to play with the Detailed Gate Thinlits again, this time for a 50th Anniversary.

I started by cutting the gate from Gold Foil using the Detailed Gate Thinlits. I scored each side about 1/4" in from the edge to allow me to fold the edge around the card front. I then used my Stampin' Trimmer to slice down the middle to create the two gate halves.

I cut a square card base from Soft Suede to match the size of the folded gates and then used the shaped die to cut the shape of the top of the gate into the card base. I repeated this cut with both a Soft Suede and a Very Vanilla matte.

Linda Vich Creates: Detailed Gate 50th Anniversary. The Detailed Gate Thinlits are used to create golden gates for this 50th Anniversary card.
Arrow shows shaped die used to cut shaped card and mattes
On the Soft Suede matte I used Early Espresso to stamp the sentiment using two retired stamp sets: Falling For You and Project Life Day To Day. I used the Confetti Hearts Border Punch to punch little hearts from gold foil. These were adhered to the matte using liquid adhesive. The gates were then adhered to the matte and the matte adhered to the card front.

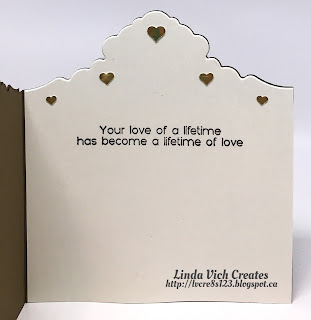
The inside sentiment was stamped on the shaped Very Vanilla matte and then it was adhered inside the card using Fast Fuse. A few more gold hearts were adhered to the matte.

To finish the card, the now retired 1/8" Gold Ribbon was threaded through each side of the golden gates and tied in a bow to secure the card.

Linda Vich Creates: Detailed Gate 50th Anniversary. The Detailed Gate Thinlits are used to create golden gates for this 50th Anniversary card.

Linda Vich Creates: Detailed Gate 50th Anniversary. The Detailed Gate Thinlits are used to create golden gates for this 50th Anniversary card.

Linda Vich Creates: Detailed Gate 50th Anniversary. The Detailed Gate Thinlits are used to create golden gates for this 50th Anniversary card.

Linda Vich Creates: Detailed Gate 50th Anniversary. The Detailed Gate Thinlits are used to create golden gates for this 50th Anniversary card.


I think that the gold gates work well for a 50th Anniversary! If I use foil for the gates again, I may try sponging the inside of the gates with ink, either gold or some other dark color. I think they would look better than the white backing.


Thursday, September 21, 2017

Quilt Builder Christmas Card

Linda Vich Creates: Quilt Builder Christmas Card. Red, white and black create a dynamic quilt pattern using the Merry Music DSP on this Christmas card.
I have sewed only a few things in my lifetime–a blouse for home ec in grade 9, a dress for my wedding social, a dress for my daughter's first photo with Santa and some bibs.

Sewing is not something I truly enjoy possibly due to the way my mother tried to teach me how to lay out a pattern. Though I first learned to sew at school, in practicing my skills at home, my mother tried to get me to adopt her way of laying out a pattern on the fabric.

This method did not involve mimicking the pattern layout from the pattern itself. Instead, it involved folding the fabric in several different ways to find the most economical use of the material so as to end up with fabric left over for some future project. I simply could not wrap my brain around this method and it left me totally frustrated with the sewing process and I hadn't even got to the sewing machine yet!

Regardless, I have an appreciation for those who possess sewing skills and who can work wonders with a length of fabric, my daughter being one of those people! One year, she was able to measure, design, and sew a tuxedo for our dog, Brandy, to wear on Christmas Eve!

I have an even greater appreciation for those who create magnificent works of art in the form of quilts. The new Quilt Builder Framelits allow non-sewers like me the chance to create quilted cards. With so many lovely DSP choices, how could quilting cards not be fun?

For my first quilted card, I chose some of the lovely black paper in the Merry Music Specialty DSP as well as a red gingham paper from the Quilted Christmas pack as well as Basic Black and Whisper White card stock. Using the star dies from the Quilt Builder Framelits, I used the two dies together to cut the black outline of the star.

Using a method from Klompen Stampers I placed the outline on a piece of Press and Seal paper. I then cut the inside star shape three times using the Whisper White and the two DSP choices. After choosing the appropriate pieces from each, I filled in the quilt, sticking the pieces to the Press and Seal paper.

Once the quilted star was complete, I folded the Press and Seal over the design and turned the piece over. After carefully peeling back the Press and Seal, I applied glue to the back of the star piece and then lifted the star piece and adhered it to a Basic Black square of card stock.

After die cutting a Basic Black stitched square, I layered and then adhered the star design with the black square turned 45 degrees, using Dimensionals. I adhered a matte of the Merry Music DSP to a Real Red 5 x 5" card base and then added the quilted layers using Dimensionals. Because the card front was so busy with all the patterned DSP, I left the sentiment for inside the card.

I used a stamp from the Quilted Christmas stamp set to stamp with Basic Black on Whisper White and then die cut it with the matching die. I also cut an outline of the shape using Basic Black. These shapes were layered together and placed on top of the star piece. A Clear Faceted Gem was colored with a red Sharpie and adhered in the middle. To complete the card front, a length of the 1/8" Real Red Ribbon was wound around the card and tied with a bow.

A Whisper White matte for the inside was stamped with a sentiment from the Snowflake Sentiments stamp set using Real Red. A matching shape with a stitched outline was also stamped. Basic Black on a Sponge Dauber gave a fine inked line around the matte.

Linda Vich Creates: Quilt Builder Christmas Card. Red, white and black create a dynamic quilt pattern using the Merry Music DSP on this Christmas card.

Linda Vich Creates: Quilt Builder Christmas Card. Red, white and black create a dynamic quilt pattern using the Merry Music DSP on this Christmas card.

Linda Vich Creates: Quilt Builder Christmas Card. Red, white and black create a dynamic quilt pattern using the Merry Music DSP on this Christmas card.

I know I'll be playing with the Quilt Builders agains soon–so many possibilities, and not just for Christmas!



Wednesday, September 20, 2017

Colorful Seasons Birthday

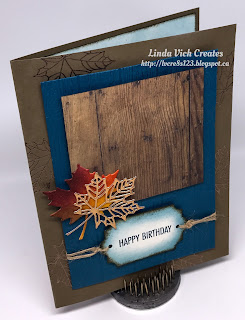
Linda Vich Creates: Colorful Seasons Birthday. Heat embossed copper leaves peak from beneath a dry embossed wood plank matte, topped with a square of Wood Textures DSP that is embellished with die cut leaves.
The card share I have for you today was CASEd from a card by Natalie Lapakko. I liked her use of the Wood Textures DSP with the ornate leaf die cut from the Seasonal Layers Thinlits. However, I find it very hard to make a truly clean and simple card!
To begin with, I cut a 5 x 7" card base from Soft Suede. Using Versamark, I stamped the detailed leaf from the Colorful Seasons stamp set around the edges of the card front and then heat embossed them with Copper Stampin' Emboss Powder.

I then cut a Dapper Denim matte and dry embossed it using the Pinewood Planks Dynamic Embossing Folder after first spritzing it with water. A square of both Soft Suede and the Wood Textures DSP was cut and the two adhered together using liquid adhesive. A Soft Suede marker was used to edge the complete piece so that the white edges from the DSP did not distract from the beauty of the card.

Using the dies from the Seasonal Layers Thinlits, I die cut a leaf from Watercolor Paper and the detailed leaf from Copper Foil. Using sponges, I added color to the watercolor paper leaf.

The sentiment from the That's The Tag stamp set was stamped on Very Vanilla using Dapper Denim and then punched with the Everyday Label Punch. I used the now retired Paper Piercing Pack Essentials along with my Piercing Mat and Piercing Tool to line up and pierce two holes in the tag which I then punched with the 1/8" Circle Punch.

Linda Vich Creates: Colorful Seasons Birthday. Heat embossed copper leaves peak from beneath a dry embossed wood plank matte, topped with a square of Wood Textures DSP that is embellished with die cut leaves.
Photo shows the Paper Piercing Pack Essentials
being used to pierce holes symmetrically in the tag.

Linda Vich Creates: Colorful Seasons Birthday. Heat embossed copper leaves peak from beneath a dry embossed wood plank matte, topped with a square of Wood Textures DSP that is embellished with die cut leaves.
The pierced holes were used as a guideline for
punching holes with the 1/8" Circle Punch.

Dapper Denim and Soft Suede were sponged around the tag and then I used Linen Thread to attach the tag and taped the ends on the back of the Dapper Denim matte. The wood matte was attached to the top of the matte using Dimensionals with the colored leaf also being attached with Dimensionals and the copper leaf with glue dots. The Dapper Denim matte was then adhered to the card front using Dimensionals.

For inside the card, the ornate leaf was stamped with Versamark and heat embossed with copper on Very Vanilla. Dapper Denim was sponged around the edges before the matte was adhered inside to complete the card.

Linda Vich Creates: Colorful Seasons Birthday. Heat embossed copper leaves peak from beneath a dry embossed wood plank matte, topped with a square of Wood Textures DSP that is embellished with die cut leaves.

Linda Vich Creates: Colorful Seasons Birthday. Heat embossed copper leaves peak from beneath a dry embossed wood plank matte, topped with a square of Wood Textures DSP that is embellished with die cut leaves.

Linda Vich Creates: Colorful Seasons Birthday. Heat embossed copper leaves peak from beneath a dry embossed wood plank matte, topped with a square of Wood Textures DSP that is embellished with die cut leaves.

I really like the look of the Dapper Denim with the wood and the copper foil!


Monday, September 4, 2017

Pearly Gates Sympathy Card

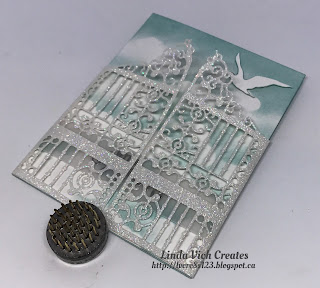
Linda Vich Creates: Pearly Gates Sympathy Card. The Detailed Gate Thinlits are used as the gates to Heaven in this sympathy card.
It's a terrible thing to lose your mojo. Even though I wanted to craft and I loved looking at crafting ideas but actually sitting down and crafting myself just didn't seem to be in the cards (pun intended) for me.

This summer has been productive in other ways but not so much for card making. However, I was in need of a sympathy card and there was no way I was going to buy a card so I sat myself down and made one! My card is CASEd from a card by Janet Wakeland.

I began my card by cutting a piece of Watercolor Paper to 4.25 x 5.5". I used the clouds from the Up & Away Thinlits to die cut cloud templates from Thick Whisper White. Using the templates alternately, I sponged Soft Sky onto the watercolor paper to create a cloud-filled sky.

Next, I die cut Dazzling Diamonds Glimmer Paper using the Detailed Gates Thinlits. To make this easier, I first removed the protective covering layer from the back of the sheet of glimmer paper. I then used the dryer sheet method for die cutting using my Magnetic Platform.

Because I wanted to adhere the gates to the sky panel, I scored each side of the gates at about 1/4" from the edge. Finally, I used my Stampin' Trimmer to slice down the middle of the gates so that they would open.

On a strip of Vellum, I stamped the sentiment from the Rose Wonder stamp set and heat embossed with Silver Stampin' Emboss Powder. I wrapped the sky panel with the vellum strip, folding it crisply at each edge, and then taped it to the back of the panel.

I then used liquid adhesive to adhere the gates to each side of the panel. The panel was then adhered to a Soft Sky card base using Fast Fuse adhesive.

I heat embossed the inside sentiment on a Whisper White matte and then sponged the edges with Soft Sky before adhering it inside the card.

To finish the card, I die cut a dove from Thick Whisper White using a die set from Impression Obsession. I used Mini Dimensionals to adhere the bird to the front of the card.


Linda Vich Creates: Pearly Gates Sympathy Card. The Detailed Gate Thinlits are used as the gates to Heaven in this sympathy card.

Linda Vich Creates: Pearly Gates Sympathy Card. The Detailed Gate Thinlits are used as the gates to Heaven in this sympathy card.

Linda Vich Creates: Pearly Gates Sympathy Card. The Detailed Gate Thinlits are used as the gates to Heaven in this sympathy card.

Linda Vich Creates: Pearly Gates Sympathy Card. The Detailed Gate Thinlits are used as the gates to Heaven in this sympathy card.


If I made this card again, I would die cut one gate from the Glimmer paper and one from Whisper White and adhere them together. This would prevent the gate from curling at the top. Other than that, I am pleased with how my card turned out!

Hopefully, this is the kick start that I need for my mojo!